Showing posts with label first birthday party. Show all posts

Monday, August 1, 2011

Evie turns 1

Stellas best friend Evie joined her on the toddler brigade last week and has turned the almighty one. Best toddler buddies are even cuter than best baby buddies! We were lucky enough to be invited to her special first birthday party and it was a hoot!

Evies party was the cutest little green and purple owl theme. Ali put together paper buntings and made the most gorgeous owl cupcakes!

Stella and I are both so grateful to have Ali and Evie's friendship...Happy Birthday little Evie darling!

Tuesday, July 19, 2011

THE party.

Stellas first birthday party. (VERY IMAGE HEAVY)

Lots of preparation, lots of excitement, lots of fun. It wouldn't have been possible without the help from my closest friends, Thankyou all so much! (Sophie, Lauren, Emily, Ali and Lydia) Also, thankyou to my dear friend Nicole; The cupcake fairy who supplied the cupcakes and cakes. I don't think I need to say much else, I'll just share the incredible photos with you!


Thank you so much to everyone who came, What a party! One we will certainly remember
Plenty of love...


Friday, July 8, 2011

Two days to go!

Only two days left to go and it's party time!

Tonight I have a date with Sophie and Lauren to shop for food, organise platters, start blowing balloons and last minute decoration preparation. I am feeling nice and organised now and am just looking forward to Saturday. My dear friend Emily is watching Stella Saturday morning and encouraging her to sleep whilst we set up at the venue and rush around madly.

I was chatting with Lauren over some pom poms and red wine the other night (as we do). We were talking about the party and the lengths I am going to to make it as amazing as I can. I started off the conversation with "People think I'm crazy" but after much thought and reflection I had come to the conclusion that this party is more than just a gathering for little toddlers and their parents to eat cake. Its a celebration of a tremendous year. Celebrating my first year of motherhood, Stella's first year of life. Celebrating what has been a very challenging and emotionally draining year. We have come out on the other side happier than ever, with a stronger and more amazing support network. It is to celebrate the beautiful and inspirational people Stella and I are sharing our lives with, and they will all be there.

So let me indulge in a little 'over-the-top' party planning and executing and lets celebrate Stella turning 1 plus much, much more. I'll leave you with some little teaser photos! Only 2 days to go!


Thursday, July 7, 2011

Pretty pretty Pom Pom.


Pom poms are the easiest, prettiest decoration you can make yourself. For your home, for parties, for gifts or just for kicks! I have black and white pom poms in my bedroom hung by lace necklaces, there are pretty pastel pom poms in Stella's room with photos pegged onto them and there are doily pom poms hanging in my kitchen.

Now that I have started making them, its near impossible to stop. Stella's birthday party was the best excuse to see how many pom poms I could make in the space of a week. I quickly shared the secret with my closest creative friends Soph and Lauren and all three of us have been caught in a pom pom romance!

I know there are a squillion pom pom tutorials on the Internet, but nevertheless I am going to share my own. Grab some tissue paper, sit down with a cuppa and pom pom pom away!
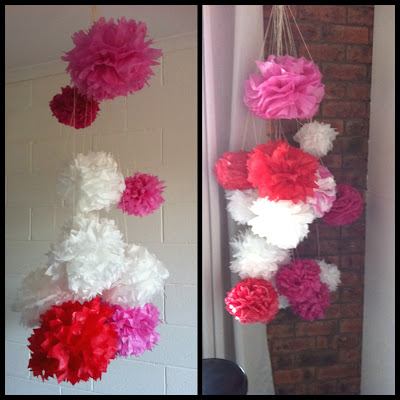

The current collection of pom poms in the toyroom of my house, waiting for the big party!


Step 1: Gather sheets of tissue paper. Either one block colour or alternate coloured sheets. I used 12 sheets for a large pom pom. You can make them as small or as large as you please


Step 2: starting from the bottom start folding the tissue in 'fan' style, for a large pom pom with 12 sheets I use 1 inch increments, for a smaller one I use half the size of tissue paper, 8 sheets and fold in half inch increments.


Step 3: Tie whatever you'd like to anchor your pom with in the middle of the folded fan. You can use ribbon, cotton, string, anything really!

Step 4: Angle the edges of each end of the fan. You can chose pointed, rounded or scalloped for different effects.


Step 5: Fold out your fan and lay flat.

Step 6: Gently start pulling each layer of tissue one at a time towards the middle, be careful not to rip the tissue.


Step 7: Separate half the amount of sheets (eg. 6 sheets on a large 12 sheet pom) on one side before turning over and separating the other half from the bottom.


And there you have it! A pom pom. Go forth and let them multiply. Here are some other tutorials that I like if you'd like to read a different one. Happy creating!